TIPS
How to shoot a basic corporate portrait
("headshot")
Copyright 2020 by Richard Harris
(formally trained photo-journalist)

(Can you spot the guidelines I violated
in this mediocre headshot?)
How to shoot a basic corporate portrait
("headshot")
Copyright 2020 by Richard Harris
(formally trained photo-journalist)
(Can you spot the guidelines I violated
in this mediocre headshot?)
1.)
Forget all the fancy technical and professional advice on this topic.
This is how to do a SIMPLE, BASIC corporate portrait,
such as for a small business or organization,
doing a cheap, quick, do-it-yourself photograph.
(Of course, for better results, use a professional photographer, instead.)
There IS a lot to do here, and you may get away with not doing some of it.
But the more of it you do, the happier you (and your subject) will be with the results.
By all means, read ALL of these instructions FIRST, before beginning. In particular, make sure you've prepared your equipment as outlined here, and that your subject is dressed/made-up, as recommended here, before starting the shoot.
A preliminary practice run, with the real subject, or a substitute (e.g.: an associate, friend, relative, neighbor, cooperative pet, stuffed animal, big doll, or yourself), is a good idea, before doing the shoot that matters. This can be especially important if the subject is a person with little time / limited availability, or no patience.
------------------- PLAN THE SHOOT -------------------
2.) DETERMINE THE INTENDED USE(s) for the photo(s).
a.)
The intended use determines what
RESOLUTION (how many dots)
the picture should have.
That, in turn, determines the camera
(and camera settings) that you need.
On a typical COMPUTER SCREEN:
Expect about 100 dots across for each inch of picture width
(100 dots-per-inch, or "100 dpi").On PAPER PRINTOUT:
Expect about 300 dots across for each inch of picture width
(300 dots-per-inch, or "300 dpi").
b.)
For photos to display on COMPUTER SCREENS
(for websites, e-mails, or computer programs),
...a suitable picture can be as few as:
640 pixels (dots) wide,
by
480 pixels tall
-- "640x480."640x480 (304,000 pixels, total -- about a third of a "megapixel")
is the most basic, minimal resolution
of most early desktop-computer screens and smartphones,
and is commonly adequate for most websites and e-mails.Most website images are usually even lower resolution
with many small portraits only showing at
about 200x300 pixels (0.06 megapixels).
My own portrait, above, is only 152x219 pixels
(when viewed on a web browser set at 100%: not zoomed in or out.)
Some web page icons are as tiny as 16x16.On a typical 1440x768 computer monitor,
a 640x480 image will fill about one-quarter of the screen,
but can be scaled up or down, fairly safely,
by the web page designer.
(On a smartphone, a 640x480 image may fill the screen.)If your camera cannot produce a resolution that low, it's OK.
Your web page designer can shrink it.
(My 152x219 photo, above, was shrunk down, and cropped,
from an overly huge 2000x3000 original photo.)
On the other hand,
enlarging is a bit more challenging --
and if enlarged too much, a small original image begins to
look blurry,
"blotchy" or
"pixelated" (divided into chunky blocks).
(See examples at right.)So, it's generally better to start with a slightly
higher resolution image than you need,
rather than a
lower-resolution image than you need.
To fill a common 1440x768 laptop computer screen:
- Use a resolution of approximately 1440x768 (about 1.1 megapixels)
c.)
For photos to print on PAPER:
For small images on paper (about an inch-and-a-half / about 4 cm. wide)
-- for business cards, small photos on brochures, etc. --
640x480 (only about a third of a "megapixel") can be adequate.
800x600 (only about a half of a "megapixel") can be adequate.A small "snapshot" photo print (4"x5" / 10x13 cm.)
requires 1200x1500 -- 3,600,000 pixels, or 3.6 "megapixels" ("3.6 MP"), total.
(wise photographers shoot with camera set for 4 megapixels or larger,
for room to crop and adjust the photo).A full-size portrait photo print (8"x10" / 20x25 cm.)
requires 2400x3000 -- 7,200,000 pixels, or 7.2 "megapixels" ("7.2 MP"), total.
(wise photographers shoot with camera set for 8 megapixels or larger,
for room to crop and adjust the photo).
d.)
If your end-user (such as a web editor or brochure designer)
has photo-editing software and skills...
...shoot the picture somewhat higher the minimum resolution,
to give them "plenty of room to work with."
3.) DECIDE ON THE CAMERA(s) TO USE,
(Note that cameras with bigger lenses (if clean) usually produce better photos.)
- The camera feature in small, basic cell phones ("flip phones")
are typically limited to about 2 megapixels (about 1600x1200 resolution).
- Some flip phones, and most "smart phones"
have higher-resolution cameras,
as much as 14 megapixels in some.
- Digital cameras range
from 640x480 (a third of a "megapixel")
all the way up to 20 megapixels or more.Anything beyond 10 megapixels (about 3600x2700) is unnecessary, even excessive.
Scale it down to a lower-resolution setting.
About 3 to 8 megapixels is the ideal range.
To find out the resolution of your digital camera, or your phone's camera, either...
a.) Check the instruction manual for your camera or phone.
b.) Check the online "specifications" for your model of phone.
c.) Explore the phone's/camera's camera-settings options.
d.) Take a photo with the camera, and send it to someone's computer (via e-mail), and have them look at it in their folder, hover their cursor over it, and the resolution should be indicated by a pop-up "balloon" of text. Or they could "right-click" on the image, and select "properties" and view the resolution there.(NOTE: On digital cameras, lens quality is probably the most important consideration,
and generally "bigger is better", regardless of resolution)
------------------- SET UP THE SHOOT -------------------
4.) PREPARE THE CAMERA.
b.) Make that there is enough space in the camera for at least 10-20 more photos.
c.) Make sure the camera has fresh, fully-charged batteries (and bring extra batteries, if you have them).
d.) Make certain that the camera lens is clean. Use only a very soft cloth. Avoid using liquids or soap (although the cloth can be damp with plain water). Wipe the lens in gentle circles, working out from the center.
e.) Find a stable support for the camera (typically a tripod, step-ladder, table, or chair). Also, bricks, books, sturdy boxes, or other solid objects, may help you adjust the camera height more precisely. A pole, or broom-handle, may also help when standing.
5.) PREPARE THE SUBJECT PERSON. Make sure they:
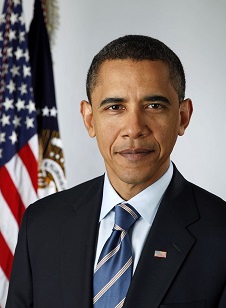
|
|
| Former U.S. President Barack Obama (official U.S. government photo) | Former U.S. Secretary of State Condoleeza Rice (official U.S. government photo) |
NO COLLAR-LESS T-SHIRTS EVER !!!
(except on women wearing blazers or jackets).
AVOID SHORT SLEEVES (except possibly on workmen).
NO HEADWEAR (except possibly on workmen, or for religious/modesty reasons, or to conceal a problem).
NO JEWELRY, TATOOS, PIERCINGS, OR OTHER FACIAL ADORNMENTS
(a simple necklace may be appropriate for women; earrings not recommended).
NOTHING IN HAIR.
NO SMOKING PRODUCTS (cigarette, cigar, pipe, etc.)
NO HEARING AIDS, EAR PLUGS, HEADPHONES, ETC..
EYEGLASSES ONLY AS NECESSARY.
(NOTE: If wearing eyeglasses, avoid light reflections in the glasses, by tilting head downward.)
b.) Have a clean, ready face:
c.) Have looked in the mirror, and are satisified with how they look.
6.) SET THE STAGE:
The background should not be more eye-catching than the person.
For the background,
a smooth, blank wall or partition is usually best.
A plain, flat, one-color, no-wrinkles bed-sheet or blanket,
or a big, single-color sheet of cardboard, may work.
|
| From the U.S. Dept. of State: "Guidelines for Producing High Quality Photographs for U.S. Travel Documents," which contains other excellent tips and examples. |
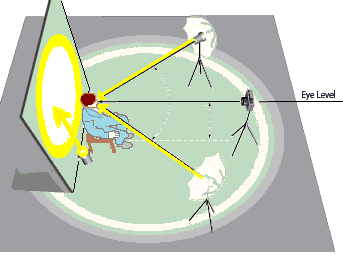
b.) Set up lighting
(all-incandescent, or all-flourescent, or all-daylight):
(NOTE: Alternatively, as shown in the diagram at right), both lights could be about the same relative position, in front of the subject, and off to either side).
Avoid lighting that casts a shadow on the face, neck or clothing.
Do not hang a light directly over the person's head.
c.) If using a digital camera...
...set its "white balance" or "lighting"
for the type of light you are using,
so that the person's face looks natural.
d.) Position your camera at the same height as the subject's face.
e.) Make sure the subject person is comfortable.
f.) Ensure there are NO interruptions during the photo shoot. NO EXCUSES.
(The actual shoot should take less than 20 minutes, at most).
g.) Turn off all cell phones (except the one taking the photo, and turn its volume down, but not to "vibrate").
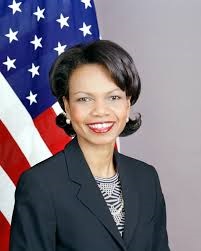
|
|
|
| Former U.S. President Barack Obama (official U.S. government photo) | Former U.S. Secretary of State Condoleeza Rice (official U.S. government photo) |
b.) Have them keep their head up STRAIGHT,
and look directly into the camera lens,
(as if the photographer is inside it).
Tell them to:
c.) Have them face the camera directly.
(Then, during the shoot, either the photographer moves around them,
or the subject turns himself/herself to different angles.)
------------------- BEGIN THE SHOOT -------------------
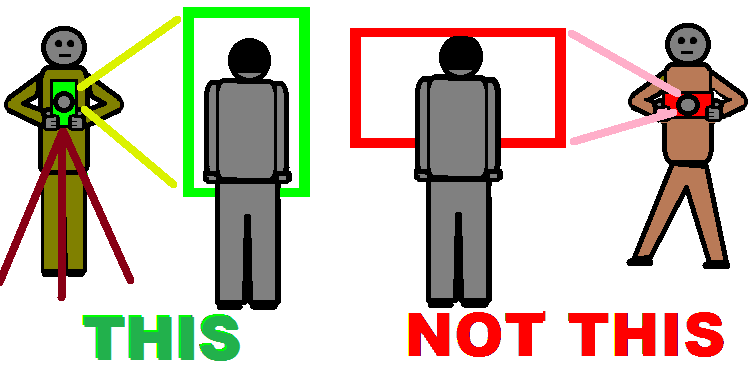
8.) POSITION THE PHOTOGRAPHER & CAMERA:
b.) Ensure a firm, stable support for the camera (see 4.e., above).
c.) Hold the camera in the
"PORTRAIT"
position
(long dimension vertical,
narrow dimension horizontal)
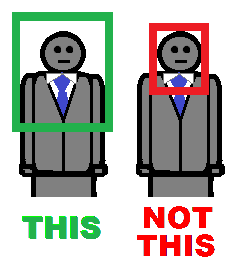
9.) GET THE PERSON IN THE PICTURE CORRECTLY:
Ensure their WHOLE face is in the photo, with space all around it.
Their shoulders should be completely inside the photo
The photo should probably extend from their chest,
to at least two inches (5 cm.) above their head.
10.) SHOOT THE PHOTOS FROM A DISTANCE
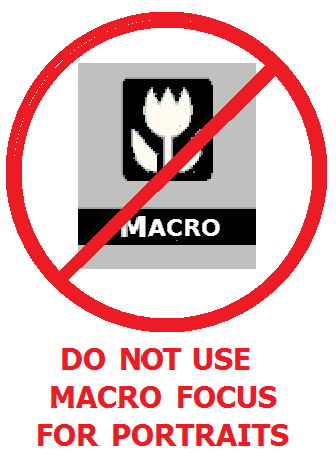
Be careful that the camera is NOT set on MACRO-focus
(which is strictly for close-ups, less than 3 feet away).
(Macro setting is commonly indicated by a symbol of a flower
on the camera's view screen or control panel.)
You should NOT be that close to the subject,
11.) ALWAYS HOLD THE CAMERA ON A STEADY SURFACE.
12.) SHOOT VARIOUS...
a.) Shoot every photo THREE times
-- from very slightly different angles, if possible.
b.) Shoot WITH and WITHOUT flash
c.) Shoot the person from at least three very different angles
-- always looking at you.
|
|
|
| Former U.S. President Barack Obama (official U.S. government photo) | Former U.S. Secretary of State Condoleeza Rice (official U.S. government photo) |
e.) Person should always look...
Check the photos carefully, during the shoot, to make sure they fit this requirement.
13.) REPEAT THE SHOOT, WITH A DIFFERENT CAMERA,
------------------- FINISH THE JOB -------------------
14.) LET THE SUBJECT PERSON SEE THEIR PHOTOS.
15.) PROTECT THE PHOTOS: